WARNING:
All procedures are GENERALIZED.
Always fly per Pilot Operating Handbook procedures,
observing any relevant Standard Operating Procedures (SOPs)
Preflight Planning & Before Takeoff Briefing:
-
Preflight Planning:
- Determine abort criteria and abort point at which point a safe abort can be made on the runway remaining
- Abort criteria may be, for example:
- Achieving 70% of rotation speed by 50% of calculated takeoff distance (determine marker to identify when taking off)
- For clearing obstacles, 70% of rotation speed by 30% of available takeoff distance
- Abort criteria may be, for example:
- Determine abort criteria and abort point at which point a safe abort can be made on the runway remaining
-
Passenger Briefing Considerations:
- FAR 91.519, passenger briefing, outlines the minimum briefing requirements
- The preflight briefing is required to be given by the Pilot-In-Command to passengers deemed unfamiliar with the contents of the briefing
- The pilot in command is also required to brief and notify their passengers on several aspects of the aircraft, remembered using the S-A-F-E-T-Y acronym
- S - Seatbelts and shoulder harnesses
- A - Air (vents/climate control), motion sickness
- F - Fire precautions including the prohibition of smoking and location of the extinguisher
- E - Equipment (doors, survial equipment, emergency locator transmitted, etc.)
- T - Traffic and talking
- Discuss aborted takeoff criteria and procedures
- Discuss ditching procedures to include what to expect how to egress, and a rally point following egress
- Y - Your (passenger) questions
- Consider Pilot Workshop's Pilot Workshops - Flying with Children recommendations
- FAR 91.519, passenger briefing, outlines the minimum briefing requirements
-
Takeoff Briefing Considerations:
- An often overlooked procedure on the ground is the pre-takeoff briefing
- Who will perform the takeoff?
- Takeoff runway
- Type of takeoff required/configuration
- Expected performance vs. runways available
- Engine performance is verified on the runway when the throttle is advanced to takeoff power and monitored while on takeoff roll
- Appropriate V speeds
- Obstacles on departure
- Departure instructions expected
- Contingencies, such as engine failure
- Set decision points at altitudes and/or points where options for emergency responses change (for example, landing straight ahead vs. turning toward a road)
- Consider immediate landing locations if a contingency is encourtered appropriate to the weather or where appropriate services are available (i.e., nearby airports were better approaches or crash fire rescue
- Remember, land as soon as possible means just that - only deviate when needing to land as soon as practical
- "REACT" Acronoym
- RPM: as expected
- Engine: readings are correct
- Airspeed: increasing as expected
- Centerline: still tracking centerline
- Takeoff abort point: if reached, abort
- Read more about non-pilot passenger considerations in AOPA's Pinch Hitter™ brochure
Before Takeoff Flows/Checklists:
- Avionics checks:
- Check radio and navigation frequencies set to the appropriate primary and secondary/standby frequencies for ease of switching during the departure
- Set heading/altitude bugs and radials as appropriate for the departure or display desired
- See Avionics Flow Check for Glass Panels like G1000, Garmin 430, 530, 650, 750 for an example
-
Private Pilot - Before Takeoff Check Airman Certification Standards:
- To determine that the applicant exhibits satisfactory knowledge, risk management, and skills associated with the before-takeoff check
- References: FAA-H-8083-2, FAA-H-8083-3, FAA-H-8083-23; POH/AFM
Before Takeoff Check Knowledge:
The applicant must demonstrate an understanding of:PA.II.F.K1:
Airport information resources, including Chart Supplements, airport diagrams, and appropriate referencesPA.II.F.K1a:
Reasons for checking each itemPA.II.F.K1b:
Detecting malfunctionsPA.II.F.K1c:
Ensuring the airplane is in safe operating condition as recommended by the manufacturer
Before Takeoff Check Risk Management:
The applicant demonstrates the ability to identify, assess, and mitigate risks, encompassing:PA.II.F.R1:
Division of attention while conducting pre-flight checks-
PA.II.F.R2:
Unexpected runway changes by ATC -
PA.II.F.R3:
Wake turbulence PA.II.F.R4:
A powerplant failure during takeoff or other malfunction considering operational factors such as airplane characteristics, runway/takeoff path length, surface conditions, environmental conditions, and obstructions
Before Takeoff Check Skills:
The applicant demonstrates the ability to:-
PA.II.F.S1:
Review takeoff performance PA.II.F.S2:
Complete the appropriate checklistPA.II.F.S3:
Position the airplane appropriately, considering other aircraft, vessels, and windPA.II.F.S4:
Divide attention inside and outside the flight deckPA.II.F.S5:
Verify that engine parameters and airplane configuration are suitable
Normal Takeoff and Climb:
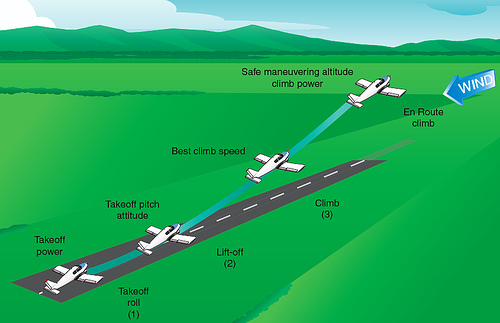
- Normal aircraft takeoffs are the most basic of all takeoff procedures/maneuvers [Figure 1]
- The purpose of this maneuver is to safely execute a takeoff under normal conditions (i.e., hard surface, minimal wind, plenty of available takeoff distance)
- Normal takeoffs are closely related to the performance of flight at minimum controllable airspeeds
-
Normal Takeoff & Climb Procedure:
- Once holding short of the runway, switch to the control tower frequency, complete the Before Takeoff Flows/Checklists, to include a takeoff brief
- Check Automatic Terminal Information Service (ATIS) and wind direction indicators, as available, and listening to the wind call given by ATC when issuing the takeoff clearances
- ONCE READY, call for takeoff:
-
Controlled Airport Takeoff Clearance:
- Pilots must request clearance from the Air Traffic Control Tower
- Pilot: "[Facility] tower, [Callsign], ready for taking off [Location/Runway], [Operation], [Altitude]"
- Example: "Danbury tower, Cessna one seven two seven victor, ready for taking off runway two-six, VFR to the north, 3,500 feet"
- ATC: "[Callsign], [Wind], cleared for takeoff [Runway]"
- Example: "Cessna One Seven Two Seven Victor, wind two seven zero at one zero, cleared for takeoff runway two-six"
- ATC may also assign departure headings and altitudes to be flown
-
Uncontrolled Airport Takeoff Broadcast:
- Announce your intentions over the Common Traffic Advisory Frequency (CTAF)
- Pilot: "[Airport Name] traffic, [Callsign], taking off [Runway] [Airport Name]"
- Example: "Danbury Traffic, Cessna One Seven Two Seven Victor, takeoff runway two-six, Danbury"
- Pilot: "[Airport Name] traffic, [Callsign], taking off [Runway] [Airport Name]"
- Announce your intentions over the Common Traffic Advisory Frequency (CTAF)
-
- Check the approach path is clear, and then taxi into takeoff position and align the airplane on the runway centerline or takeoff path
- Crossing the hold short call "Lights" (nav/strobe/landing), "Camera" (transponder), "Action" (mixture/flaps/trim/fuel pump, if required
- Utilize all available runway available (i.e., taxi straight ahead before aligning with the runway centerline)
- Ensure you roll forward enough to straighten the nose/tailwheel
- Verify that the heading indicator/magnetic compass match each other and is for that of the active runway
- Be mindful of wake turbulence considerations
- That is, expect to takeoff before the hazard and offset upwind
- There are many pre-takeoff check mnemonics that can be used to ensure proper takeoff posture
- Smoothly and continuously apply full throttle, checking engine instruments (tachometer (RPM), Manifold Pressure, as appropriate) are within their "green" operating range and callout over the Intercommunication System (ICS)
- Although not required, firmly depressing the brake pedals and performing a high-power run-up to check engine instruments or to charge a turbocharged engine may be desirable
- ICS: "Engine instruments in the green"
- Maintain directional control and runway centerline with the rudder pedals
- Lower your feet to the floor, ensuring toes are on rudders ONLY and not the brakes
- As you start to roll, monitor your airspeed and engine instruments
- ICS: "Airspeed Alive, Engine Instruments in the Green"
- Keep in the right rudder and some left aileron to counteract the p-factor crosswind effect as required
- As you accelerate, the aircraft must be flown and not taxied, requiring smaller inputs
- Confirm takeoff power and proper engine and flight instrument indications before rotation
- At rotation speed (Vr), call out, "Vr, Rotate," and increase control yoke back pressure to pitch up
- Vr will vary depending on takeoff weight
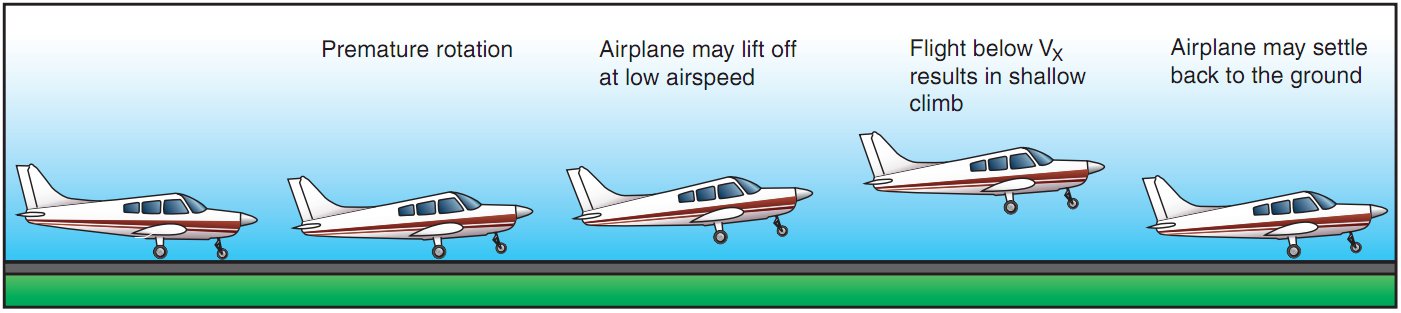
- Smoothly pitch up, or the aircraft may delay a climb
- Forcing the aircraft off the ground may leave it stuck in the ground effect or stall [Figure 2]
- During gust conditions, the pilot should remain on the deck a little longer
- After lift-off, establish and maintain the best climb rate (Vy), while maintaining the flight path over the runway centerline
- Trim as necessary
- Avoid P-factor impacts by using the rudders to keep the airplane heading straight down the runway
- With a positive rate of climb, depress the brake pedals, call out, "Positive Climb"
- An increase in altitude and positive VSI demonstrates a positive rate of climb
- With no runway remaining, raise the landing gear, if appropriate
- Callout: "gear up"
- If remaining in the traffic pattern, leave the landing gear down so as not to forget to lower it later
- Consider aircraft performance (decreases/increases in drag) when the gear is in motion and how that impacts desired performance
- During the climb out (no less than 200' AGL), lower nose momentarily to ensure that the airspace ahead is clear, and then reestablish Vy while maintaining flight path over the extended runway centerline
- Trim as necessary
- At 500' AGL, lower the pitch (approx. 2-3°) to establish and maintain a cruise climb or Vy as appropriate
- Set cruise power
- Trim as necessary
- Execute a departure procedure or remain in the traffic pattern as appropriate
- If remaining in the traffic pattern, leave the auxiliary fuel pump switch in the ON position
- Complete the climb flow/checklist when appropriate
-
Normal Takeoff and Climb Common Errors:
- Failure to adequately clear the area before taxiing into position on the active runway
- Abrupt use of the throttle
- Failure to check engine instruments for signs of malfunction after applying takeoff power
- Failure to anticipate the airplane's left-turning tendency on initial acceleration
- Over-correcting for left-turning tendency
- Relying solely on the airspeed indicator rather than developed feel for indications of speed and airplane controllability during acceleration and lift-off
- Failure to attain a proper lift-off attitude
- Inadequate compensation for torque/P-factor during initial climb resulting in a side-slip
- Over-control of elevators during initial climb-out
- Limiting scan to areas directly ahead of the airplane (pitch attitude and direction), resulting in allowing a wing (usually the left) to drop immediately after lift-off
- Failure to attain/maintain best rate-of-climb airspeed (Vy)
- Failure to employ the principles of attitude flying during climb-out resulting in "chasing" the airspeed indicator
-
Normal Takeoff and Climb Airman Certification Standards:
- To determine that the applicant exhibits satisfactory knowledge, risk management, and skills associated with normal takeoff, climb operations, and rejected takeoff procedures
- Note: If a crosswind condition does not exist, the applicant's knowledge of crosswind elements must be evaluated through oral testing
- References: FAA-H-8083-2, FAA-H-8083-3, FAA-H-8083-23; POH/AFM; AIM
Normal Takeoff and Climb Knowledge:
The applicant must demonstrate an understanding of:-
PA.IV.A.K1:
Effects of atmospheric conditions, including wind, on takeoff and climb performance -
PA.IV.A.K2:
VX and VY -
PA.IV.A.K3:
Appropriate airplane configuration
Normal Takeoff and Climb Risk Management:
The applicant demonstrates the ability to identify, assess, and mitigate risks, encompassing:PA.IV.A.R1:
Selection of runway based on pilot capability, airplane performance and limitations, available distance, and wind-
PA.IV.A.R2:
Effects of:-
PA.IV.A.R2a:
Crosswind -
PA.IV.A.R2b:
Windshear -
PA.IV.A.R2c:
Tailwind -
PA.IV.A.R2d:
Wake turbulence -
PA.IV.A.R2e:
Runway surface/condition
-
-
PA.IV.A.R3:
Abnormal operations, to include planning for:-
PA.IV.A.R3a:
Rejected takeoff -
PA.IV.A.R3b:
Engine failure in takeoff/climb phase of flight
-
-
PA.IV.A.R4:
Collision hazards, to include aircraft, terrain, obstacles, wires, vehicles, vessels, persons, and wildlife PA.IV.A.R5:
Low altitude maneuvering, including stall, spin, or CFITPA.IV.A.R6:
Distractions, loss of situational awareness, or improper task management
Normal Takeoff and Climb Skills:
The applicant demonstrates the ability to:-
PA.IV.A.S1:
Complete the appropriate checklist -
PA.IV.A.S2:
Make radio calls as appropriate PA.IV.A.S3:
Verify assigned/correct runwayPA.IV.A.S4:
Ascertain wind direction with or without visible wind direction indicatorsPA.IV.A.S5:
Position the flight controls for the existing windPA.IV.A.S6:
Clear the area; taxi into takeoff position and align the airplane on the runway centerline (ASEL, AMEL) or takeoff path (ASES, AMES)PA.IV.A.S7:
Confirm takeoff power and proper engine and flight instrument indications prior to rotation (ASEL, AMEL)PA.IV.A.S8:
Avoid excessive water spray on the propeller(s) (ASES, AMES)PA.IV.A.S9:
Rotate and lift off at the recommended airspeed and accelerate to VYPA.IV.A.S10:
Retract the water rudders, as appropriate, establish and maintain the most efficient planing/liftoff attitude, and correct for porpoising and skipping (ASES, AMES)PA.IV.A.S11:
Establish a pitch attitude to maintain the manufacturer's recommended speed or VY, +10/-5 knotsPA.IV.A.S12:
Configure the airplane in accordance with manufacturer's guidancePA.IV.A.S13:
Maintain Vy +10/-5 knots to a safe maneuvering altitude-
PA.IV.A.S14:
Maintain directional control and proper wind-drift correction throughout takeoff and climb -
PA.IV.A.S15:
Comply with noise abatement procedures
Crosswind Takeoff and Climb
- While it is usually preferable to takeoff into the wind, most situations will not be a pure headwind, and some crosswind component will exist
- One example of where you may want to takeoff with a tailwind would be rising terrain or perhaps if in a glider, a lack of landing options in a rope break
- No matter what situation you have, always run the numbers and do not exceed the aircraft's limits
-
Effect of Winds on Takeoff:
-
Effects of Headwinds:
- Takeoffs will require less distance:
- Air is already flowing over the airfoils without any movement of the aircraft
- If substantial enough, the amount of wind and sensitivity of the airspeed indicator, an airspeed may register without any aircraft motion
- The aircraft feels as though it is already moving (by a factor of the headwind), therefore achieving takeoff lift in less time
- The end-state is that the aircraft will become airborne in less time, which translates to less distance
- Air is already flowing over the airfoils without any movement of the aircraft
- Takeoff at a slower ground speed
- Takeoffs will require less distance:
-
Effects of Tailwinds:
- Increased speed to develop minimum lift, causing stress on tires
- Increased takeoff distance
-
Effects of Crosswinds:
- Crosswinds will have some component that is chordwise flow (over the wings) and spanwise flow (from the wingtip to the wing root)
- The chordwise flow will be either a headwind or tailwind, as previously stated, to help or hinder performance
- The spanwise flow will always be disruptive and provide nothing as the air is not flowing over the wings from leading to the trailing edge
-
-
Assessing Crosswind Direction:
- To determine crosswind direction, reference an automated weather broadcast, the windsock, water, etc.
- In some cases, existing traffic may have established a landing direction; however, that doesn't mean the wind hasn't shifted, favoring a new direction
-
Determining Crosswind Component:
- Pilots calculate crosswinds through many methods that each serve a purpose, depending on the flight phase
- Consider your source for winds (true vs. magnetic) and remember if it's written, its true; if it's spoken, its magnetic:
- ATC reports, a windsock, or ATIS are magnetic
- METARs provide winds in true, but pilots can convert to magnetic
- Remember, winds are variable, too, so only bother converting if operating at significant deviations
- When calculating the crosswind, always use the full gust component meaning, calculate crosswind as a "worst-case" scenario
-
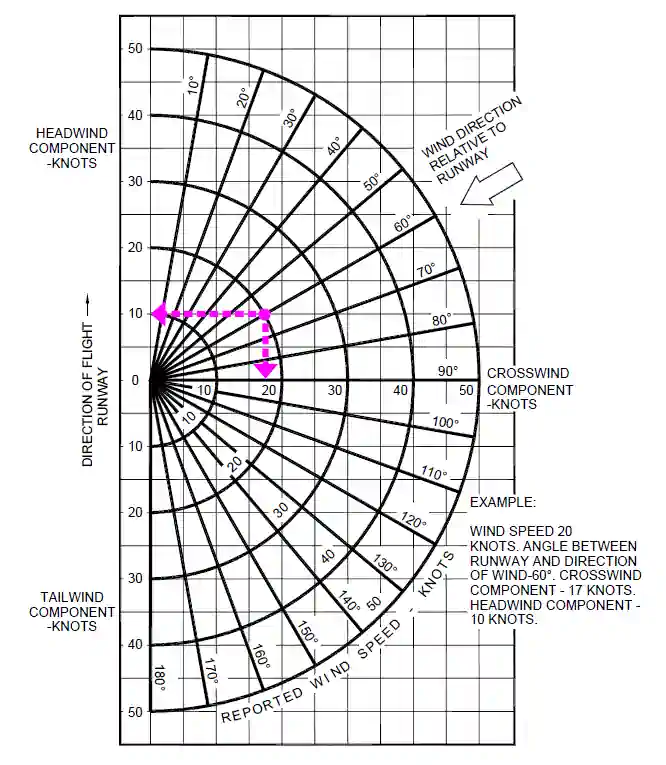
Chart Method:
- Crosswind charts can be found in nearly every POH/PIM but are not aircraft-specific, so any will do
- Using the example provided in [Figure 1], plot your point using the number of degrees off the runway heading, with the full gust component as strength
- Let's say we're going to land at runway 360, and the wind is coming from 020 at 20 knots
- We'll plot the wind strength at the 20° radial line (representing 20° off the runway) on the 20° point (representing the wind strength)
- From that point we plotted, move straight left for the headwind component, in this case roughly 19 knots
- We can also move straight down for the crosswind component in this case roughly 6 knots
-
Heading Indicator Rule-of-Thumb:
- Find the reported wind direction by reference to the outside of the DI (shown as a large blue arrow). You now have the first piece of information; the wind is from the right [Figure 2/3]
- Mentally draw a vertical line from the wind direction on the outside of the DI to the horizontal centerline (shown in blue)
- The horizontal centerline (red) represents the crosswind axis, so visually scale off the crosswind component as a proportion of the length of the crosswind axis, i.e., the wind speed
- Using our example, this means our crosswind component is just less than 20 knots (mathematically, the answer is 19 knots)
-
Sixths Rules-of-Thumb:
- If angle = 10°, then crosswind component = 1/6 wind strength
- If angle = 20°, then crosswind component = 2/6 (1/3) wind strength
- If angle = 30°, then crosswind component = 3/6 (1/2) wind strength
- If angle = 40°, then crosswind component = 4/6 (2/3) wind strength
- If angle = 50°, then crosswind component = 5/6 wind strength
- If angle = 60+°, then crosswind component = wind strength
-
Mathematical Formula:
- The formula for crosswind component = Wind Speed x Sin (Wind Angle) [Figure 2]
- Example: if the wind is 310°@ 17 knots and you line up to 330°, you can see you have a wind angle of 20°
- Reference the chart to see the sine of 20° is 0.3 and multiply that by the wind component of 17 knots, and you will get a crosswind component of 5 knots
-
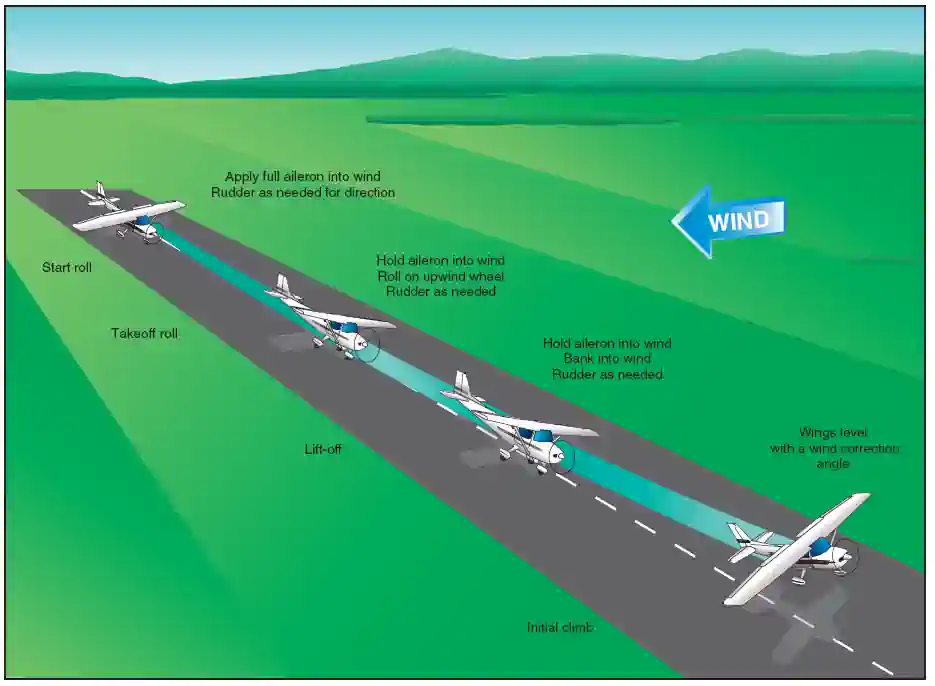
Crosswind Control Mechanics:
- From the moment you begin to taxi, you will need to compensate for the wind blowing at an angle to the runway
- Placing the yoke into the wind raises the aileron on the upwind wing to impose a downward force to counteract the lifting force of the crosswind and prevent the wing from rising
- Think of the yoke as a means to hold the wings level
- The aircraft will want to weathervane, pointing into the wind
- The rudder is necessary to maintain directional control
- As speed increases, the control surfaces become more effective as you transition from a taxi to flying, thereby requiring less input to achieve the same effect, leading to decreasing control inputs as you accelerate
- The crosswind effect will never completely disappear, meaning that some input will remain
- If, when taking out your inputs, the upwind wing is allowed to rise, it will expose more surface to the crosswind, and a side-skipping action may result
- This side-skipping imposes severe side stresses on the landing gear and could result in structural failure
- As both main wheels leave the runway and ground friction no longer resists drifting, the airplane will be slowly carried sideways with the wind unless the pilot maintains adequate drift correction
- If proper crosswind correction is applied, as soon as the airplane is airborne, it will be side-slipping into the wind sufficiently to counteract the drifting effect of the wind
- Continue side-slipping until the airplane has a positive rate of climb
- Pilots must then turn the airplane into the wind to establish just enough wind correction angle to counteract the wind, and to roll the wings level
- Allow the aircraft to weathervane as it rotates, and the effect of the crosswind will diminish
- Weathervaning puts pilots at risk of using too much of a control input, leading to a potential strike with the wingtip and the ground, especially with a low-wing aircraft
- Anticipate this by keeping the wings level and letting the airplane vane to achieve that straight ground track
- If a significant crosswind or gusts exist, keeping the main wheels on the ground slightly longer than in a normal takeoff may assist in providing a smooth but very definite lift-off
- This procedure will allow the airplane to leave the ground under more positive control so that it will remain airborne while establishing the proper amount of wind correction
-
Crosswind Takeoff and Climb Procedure:
- Once holding short of the runway, switch to the control tower frequency, complete the Before Takeoff Flows/Checklists, to include a takeoff brief
- Check Automatic Terminal Information Service (ATIS) and wind direction indicators, as available, and listening to the wind call given by ATC when issuing the takeoff clearances
- ONCE READY, call for takeoff:
-
Controlled Airport Takeoff Clearance:
- Pilots must request clearance from the Air Traffic Control Tower
- Pilot: "[Facility] tower, [Callsign], ready for taking off [Location/Runway], [Operation], [Altitude]"
- Example: "Danbury tower, Cessna one seven two seven victor, ready for taking off runway two-six, VFR to the north, 3,500 feet"
- ATC: "[Callsign], [Wind], cleared for takeoff [Runway]"
- Example: "Cessna One Seven Two Seven Victor, wind two seven zero at one zero, cleared for takeoff runway two-six"
- ATC may also assign departure headings and altitudes to be flown
-
Uncontrolled Airport Takeoff broadcast:
- Announce your intentions over the Common Traffic Advisory Frequency (CTAF)
- Pilot: "[Airport Name] traffic, [Callsign], taking off [Runway] [Airport Name]"
- Example: "Danbury Traffic, Cessna One Seven Two Seven Victor, takeoff runway two-six, Danbury"
- Pilot: "[Airport Name] traffic, [Callsign], taking off [Runway] [Airport Name]"
- Announce your intentions over the Common Traffic Advisory Frequency (CTAF)
-
- Check the approach path is clear, and then taxi into takeoff position and align the airplane on the runway centerline or takeoff path
- Crossing the hold short call "Lights" (nav/strobe/landing), "Camera" (transponder), "Action" (mixture/flaps/trim/fuel pump, if required
- Utilize all available runway available (i.e., taxi straight ahead before aligning with the runway centerline) while positioning the flight control as appropriate for the wind conditions
- Ensure you roll forward enough to straighten the nose/tailwheel
- Verify that the heading indicator/magnetic compass match each other and is for that of the active runway
- Be mindful of wake turbulence considerations
- That is, expect to takeoff before the hazard and offset upwind
- Use full yoke to position the flight controls for existing wind conditions (full ailerons, neutral elevator)
- There are many pre-takeoff check mnemonics that can be used to ensure proper takeoff posture
- Smoothly and continuously apply takeoff power, checking engine instruments (tachometer (RPM), Manifold Pressure, as appropriate) are within their "green" operating range and callout over the Intercommunication System (ICS)
- Although not required, firmly depressing the brake pedals and performing a high-power run-up to check engine instruments or to charge a turbocharged engine may be desirable
- ICS: "Engine instruments in the green"
- Release the brakes, maintaining directional control and runway centerline with the rudder pedals
- Applying power too quickly may yaw the aircraft to the left due to left-turning tendencies, most apparent in high-powered engines
- Lower your feet to the floor, ensuring toes are on rudders ONLY and not the brakes
- As you start to roll, monitor your airspeed and engine instruments
- ICS: "Airspeed Alive, Engine Instruments in the Green"
- Keep in the right rudder and some left aileron to counteract the p-factor crosswind effect as required
- As you accelerate, maintain centerline with the rudder and wings level with the aileron
- Slowly remove aileron inputs as the control surface becomes more effective
- As you accelerate, the aircraft must be flown and not taxied, requiring smaller inputs
- Confirm takeoff power and proper engine and flight instrument indications before rotation
- At Vr, call out, "Vr, Rotate," and increase control yoke back pressure to pitch up until the top of the glare shield meets the horizon
- Smoothly pitch up, or the aircraft may delay a climb
- Forcing the aircraft off the ground may leave it stuck in the ground effect or stall
- During gust conditions, the pilot should remain on the deck a little longer
- After lift-off, establish and maintain Vy while maintaining the flight path over the runway centerline
- Trim as necessary
- Use of the rudders will be required to keep the airplane headed straight down the runway, avoiding P-factor
- The remainder of the climbing technique is the same used for normal takeoffs and climbs
- With a positive rate of climb and no available landing area remaining, depress the brake pedals, call out, "Positive Climb"
- An increase in altitude and positive VSI demonstrates a positive rate of climb
- With no runway remaining, raise the landing gear if appropriate
- Callout: "gear up"
- If remaining in the traffic pattern, leave the landing gear down so as not to forget to lower it later
- Consider aircraft performance (decreases/increases in drag) when the gear is in motion and how that impacts desired performance
- During climb out (no less than 200' AGL), lower the nose momentarily to ensure that the airspace ahead is clear, and then reestablish and maintain Vy, maintaining the flight path over the extended runway centerline
- Trim as necessary
- Avoid drifting off centerline or into obstructions or the path of another aircraft that may be taking off from a parallel runway
- At 500' AGL, lower the pitch (approx. 7-8°) to establish and maintain a cruise climb
- Set cruise power
- Execute a departure procedure or remain in the traffic pattern, as appropriate
- If remaining in the pattern, keep the auxiliary fuel pump on
- Complete the climb flow/checklist when appropriate
-
Crosswind Takeoff and Climb Common Errors:
- Failure to adequately clear the area before taxiing into position on the active runway
- Using less than full aileron pressure into the wind initially on the takeoff roll
- Mechanical use of aileron control rather than sensing the need for varying aileron control input through feel for the airplane
- Premature lift-off resulting in side-skipping
- Excessive aileron input in the latter stage of the takeoff roll, resulting in a steep bank into the wind at lift-off
- Inadequate drift correction after lift-off
- Be sure your track over the ground stays aligned with the runway as part of the upwind leg
- Do not allow the aircraft to drift closer to downwind, as aircraft may be present
-
Crosswind Takeoff and Climb Airman Certification Standards:

Soft Field Takeoff and Climb:
- Soft field takeoffs maximize performance when departing from a soft or rough runway surface
- Otherwise "hard" surfaces can become "soft" following rainstorms or disturbance
- Further, surface conditions such as slush or ice can create hazardous runway conditions, warranting soft field procedures
- These soft and rough surfaces provide unique challenges that may make the aircraft harder to control and reduce acceleration
- Additionally, with soft and perhaps bumpy surfaces, you are at risk of getting the nose wheel stuck
- For this reason, procedures may specify a flap setting
-
Soft Field Takeoff and Climb Procedure:
- Once holding short of the runway, switch to the control tower frequency, complete the Before Takeoff Flows/Checklists, to include a takeoff brief
- Check Automatic Terminal Information Service (ATIS) and wind direction indicators, as available, and listening to the wind call given by ATC when issuing the takeoff clearances
- ONCE READY, call for takeoff:
-
Controlled Airport Takeoff Clearance:
- Pilots must request clearance from the Air Traffic Control Tower
- Pilot: "[Facility] tower, [Callsign], ready for taking off [Location/Runway], [Operation], [Altitude]"
- Example: "Danbury tower, Cessna one seven two seven victor, ready for taking off runway two-six, VFR to the north, 3,500 feet"
- ATC: "[Callsign], [Wind], cleared for takeoff [Runway]"
- Example: "Cessna One Seven Two Seven Victor, wind two seven zero at one zero, cleared for takeoff runway two-six"
- ATC may also assign departure headings and altitudes to be flown
-
Uncontrolled Airport Takeoff broadcast:
- Announce your intentions over the Common Traffic Advisory Frequency (CTAF)
- Pilot: "[Airport Name] traffic, [Callsign], taking off [Runway] [Airport Name]"
- Example: "Danbury Traffic, Cessna One Seven Two Seven Victor, takeoff runway two-six, Danbury"
- Pilot: "[Airport Name] traffic, [Callsign], taking off [Runway] [Airport Name]"
- Announce your intentions over the Common Traffic Advisory Frequency (CTAF)
-
- Check the approach path is clear, and then taxi into takeoff position and align the airplane on the runway centerline or takeoff path
- Crossing the hold short call "Lights" (nav/strobe/landing), "Camera" (transponder), "Action" (mixture/flaps/trim/fuel pump, if required
- Utilize all available runway available (i.e., taxi straight ahead before aligning with the runway centerline) while positioning the flight control as appropriate for the wind conditions
- Ensure you roll forward enough to straighten the nose/tailwheel
- Verify that the heading indicator/magnetic compass match each other and is for that of the active runway
- Be mindful of wake turbulence considerations
- That is, expect to takeoff before the hazard and offset upwind
- Taxi with full aft yoke, positioning the controls for existing wind conditions
- There are many pre-takeoff check mnemonics that can be used to ensure proper takeoff posture
- Without stopping the airplane, smoothly and continuously apply full throttle, checking engine instruments and tachometer (RPM) are within their "green" operating range and call-out over the Intercommunication System (ICS)
- ICS: "Engine instruments in the green"
- Keep the nose wheel clear of the runway during the takeoff roll (approx. 2-3°), maintaining directional control and runway centerline with the rudder pedals
- Lower your feet to the floor, ensuring toes are on rudders ONLY and not the brakes
- As you start to roll, monitor your airspeed and engine instruments
- ICS: "Airspeed Alive, Engine Instruments in the Green"
- Keep in the right rudder and some left aileron to counteract the p-factor crosswind effect as required
- As you accelerate, the aircraft must be flown and not taxied, requiring smaller inputs
- Confirm takeoff power and proper engine and flight instrument indications before rotation
- As the main wheels lift off the runway, lower the pitch attitude to establish and maintain a level flight attitude while remaining in ground effect and accelerating to obstacle clearance speed or the speed recommended for lower takeoff weights
-
If no obstacles are present:
- Establish a Vy climb attitude/airspeed while maintaining the flight path over the runway centerline
- Trim as necessary
-
If obstacles are present:
- Establish and maintain obstacle clearance attitude/speed (Vx) or as recommended for lower takeoff weights until clearing all obstacles, then establish a Vy climb attitude/airspeed
- Maintain the flight path over the runway centerline
- Trim as necessary
- Use rudders to keep the airplane headed straight down the runway, avoiding the P-factor
- The remainder of the climbing technique is the same used for normal takeoffs and climbs
-
- With a positive rate of climb established, depress the brake pedals, call out, "Positive Climb"
- An increase in altitude and positive VSI demonstrates a positive rate of climb
- With no runway remaining, raise the landing gear if appropriate
- Callout: "gear up"
- If remaining in the traffic pattern, leave the landing gear down so as not to forget to lower it later
- Consider aircraft performance (decreases/increases in drag) when the gear is in motion and how that impacts desired performance
- At or above safe flying speed, retract the flaps to 0°
- Establish and maintain Vy
- Trim as necessary
- Avoid drifting off centerline, into obstructions, or the path of another aircraft that may be taking off from a parallel runway
- During the climb out (no less than 200' AGL), lower nose momentarily to ensure that the airspace ahead is clear, and then reestablish Vy while maintaining a flight path over the extended runway centerline
- Trim as required
- At 500' AGL, lower the pitch to establish and maintain a cruise climb
- Maintain Vy if climb performance warrants
- Execute a departure procedure or remain in the traffic pattern as appropriate
- If remaining in the traffic pattern, leave the auxiliary fuel pump switch in the ON position
- Complete the climb flow/checklist when appropriate
-
Soft Field Takeoff and Climb Common Errors:
- Failure to adequately clear the area before taxiing into position on the active runway
- Insufficient back-elevator pressure during the initial takeoff roll, resulting in an inadequate angle of attack
- Failure to cross-check engine instruments for indicators of proper operation after applying power
- Poor directional control
- Allowing the airplane to pitch up excessively, causing a tail strike
- Climbing too steeply after lift-off
- Abrupt and/or excessive elevator control while attempting to level off and accelerate after lift-off
- Allowing the airplane to "mush" or settle, resulting in an inadvertent touchdown after lift-off
- Attempting to climb out of ground effect area before attaining sufficient climb speed
- Failure to anticipate an increase in pitch attitude as the airplane climbs out of ground effect
- Inadequate drift correction after lift-off
- Be sure your track over the ground stays aligned with the runway as part of the upwind leg
- Do not allow the aircraft to drift closer to downwind, as aircraft may be present
-
Private Pilot - Soft Field Takeoff and Climb Airman Certification Standards:
- To determine that the applicant exhibits satisfactory knowledge, risk management, and skills associated with soft-field takeoff, climb operations, and rejected takeoff procedures
- References: FAA-H-8083-2, FAA-H-8083-3; POH/AFM; AIM
- Soft Field Takeoff and Climb Lesson Plan
Soft-Field Takeoff and Climb (ASEL) Knowledge:
The applicant must demonstrate an understanding of:-
PA.IV.C.K1:
Effects of atmospheric conditions, including wind, on takeoff and climb performance -
PA.IV.C.K2:
Vx and Vy -
PA.IV.C.K3:
Appropriate airplane configuration -
PA.IV.C.K4:
Ground effect -
PA.IV.C.K5:
Importance of weight transfer from wheels to wings -
PA.IV.C.K6:
Left turning tendencies
Soft-Field Takeoff and Climb (ASEL) Risk Management:
The applicant demonstrates the ability to identify, assess, and mitigate risks, encompassing:-
PA.IV.C.R1:
Selection of runway based on pilot capability, airplane performance and limitations, available distance, and wind -
PA.IV.C.R2:
Effects of:-
PA.IV.C.R2a:
Crosswind -
PA.IV.C.R2b:
Windshear -
PA.IV.C.R2c:
Tailwind -
PA.IV.C.R2d:
Wake turbulence -
PA.IV.C.R2e:
Runway surface/condition
-
-
PA.IV.C.R3:
Abnormal operations, to include planning for:-
PA.IV.C.R3a:
Rejected takeoff -
PA.IV.C.R3b:
Engine failure in takeoff/climb phase of flight
-
-
PA.IV.C.R4:
Collision hazards, to include aircraft, terrain, obstacles, wires, vehicles, persons, and wildlife PA.IV.C.R5:
Low altitude maneuvering including stall, spin, or CFITPA.IV.C.R6:
Distractions, loss of situational awareness, or improper task management
Soft-Field Takeoff and Climb (ASEL) Skills:
The applicant demonstrates the ability to:PA.IV.C.S1:
Complete the appropriate checklist-
PA.IV.C.S2:
Make radio calls as appropriate PA.IV.C.S3:
Verify assigned/correct runwayPA.IV.C.S4:
Ascertain wind direction with or without visible wind direction indicatorsPA.IV.C.S5:
Position the flight controls for the existing windPA.IV.C.S6:
Clear the area, maintain necessary flight control inputs, taxi into takeoff position and align the airplane on the runway centerline without stopping, while advancing the throttle smoothly to takeoff powerPA.IV.C.S7:
Confirm takeoff power and proper engine and flight instrument indicationsPA.IV.C.S8:
Establish and maintain a pitch attitude that will transfer the weight of the airplane from the wheels to the wings as rapidly as possiblePA.IV.C.S9:
Lift off at the lowest possible airspeed and remain in ground effect while accelerating to Vx or Vy, as appropriatePA.IV.C.S10:
Establish a pitch attitude for Vx or Vy, as appropriate, and maintain selected airspeed +10/-5 knots during the climbPA.IV.C.S11:
Configure the airplane after a positive rate of climb has been verified or in accordance with airplane manufacturer's instructionsPA.IV.C.S12:
Maintain Vx or Vy, as appropriate, +10/-5 knots to a safe maneuvering altitudePA.IV.C.S13:
Maintain directional control and proper wind-drift correction throughout takeoff and climb-
PA.IV.C.S14:
Comply with noise abatement procedures

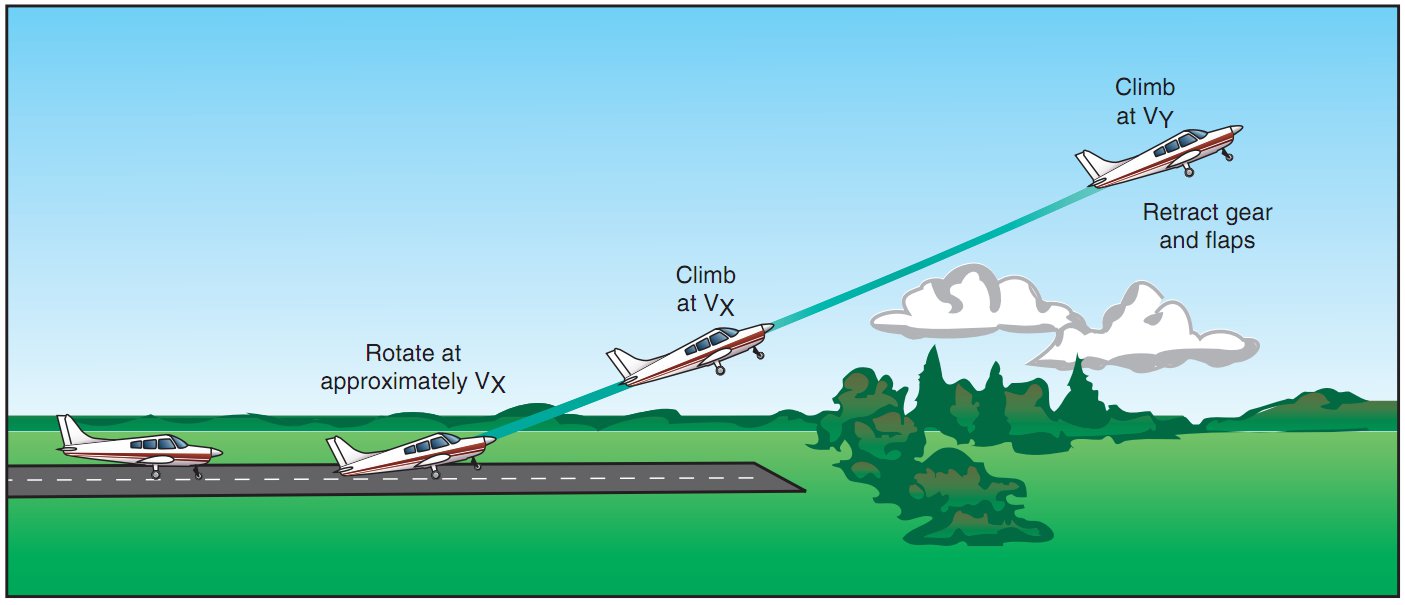
Short Field Takeoff and Climb:
- Short field takeoffs and maximum performance climbs minimize runway length required by optimizing aircraft performance [Figure 1]
- Short-field takeoffs should be considered not just when departing from shorter airfields, but also when obstacles are present
- Closely related to the performance of flight at minimum controllable airspeeds
- For this reason, procedures may specify a flap setting
-
Determining Short Field Takeoff Performance:
- Use the chart for all performance data specific to an aircraft, in this example, a Cessna 172
- Typically, there will be more than one chart for the same thing, separated by weight or aircraft configuration conditions
- Always round up if your weight is not close to the reference weights they provide; this is because takeoff data will never improve with weight, and therefore, your numbers will be more conservative and provide a safety margin
Conditions:
- Aircraft Weight: 2300lbs
- Altitude: 3,000' MSL
- 20°C Outside Air Temperature
Chart:
[Figure 4]- Starting at the left with the altitude, continue right across the chart until you reach the appropriate temperature
- We expect a 1,100' takeoff without obstacles and 1,970' with a 50' obstacle
- With a headwind of 9 knots, we can expect 990' takeoff without obstacles and 1,773' with a 50' obstacle
- With a tailwind of 4 knots, we can expect 1,320' takeoff without obstacles and 2,364' with a 50' obstacle
-
Short Field Takeoff and Climb Procedure:
- Once holding short of the runway, switch to the control tower frequency, complete the Before Takeoff Flows/Checklists, to include a takeoff brief
- Check Automatic Terminal Information Service (ATIS) and wind direction indicators, as available, and listening to the wind call given by ATC when issuing the takeoff clearances
- ONCE READY, call for takeoff:
-
Controlled Airport Takeoff Clearance:
- Pilots must request clearance from the Air Traffic Control Tower
- Pilot: "[Facility] tower, [Callsign], ready for taking off [Location/Runway], [Operation], [Altitude]"
- Example: "Danbury tower, Cessna one seven two seven victor, ready for taking off runway two-six, VFR to the north, 3,500 feet"
- ATC: "[Callsign], [Wind], cleared for takeoff [Runway]"
- Example: "Cessna One Seven Two Seven Victor, wind two seven zero at one zero, cleared for takeoff runway two-six"
- ATC may also assign departure headings and altitudes to be flown
-
Uncontrolled Airport Takeoff broadcast:
- Announce your intentions over the Common Traffic Advisory Frequency (CTAF)
- Pilot: "[Airport Name] traffic, [Callsign], taking off [Runway] [Airport Name]"
- Example: "Danbury Traffic, Cessna One Seven Two Seven Victor, takeoff runway two-six, Danbury"
- Pilot: "[Airport Name] traffic, [Callsign], taking off [Runway] [Airport Name]"
- Announce your intentions over the Common Traffic Advisory Frequency (CTAF)
-
- Check the approach path is clear, and then taxi into takeoff position and align the airplane on the runway centerline or takeoff path
- Crossing the hold short call "Lights" (nav/strobe/landing), "Camera" (transponder), "Action" (mixture/flaps/trim/fuel pump, if required
- Utilize all available runway available (i.e., taxi straight ahead before aligning with the runway centerline) while positioning the flight control as appropriate for the wind conditions
- Ensure you roll forward enough to straighten the nose/tailwheel
- Verify that the heading indicator/magnetic compass match each other and is for that of the active runway
- Be mindful of wake turbulence considerations
- That is, expect to takeoff before the hazard and offset upwind
- Use full yoke to position the flight controls for existing wind conditions (full ailerons, neutral elevator)
- Many pre-takeoff check mnemonics can be used to ensure proper takeoff posture
- Firmly depress the brake pedals to ensure holding the airplane in position during full power run-up
- Smoothly and continuously apply full throttle, checking engine instruments and tachometer (RPM)
- ICS: "Engine instruments in the green"
- Release the brakes, maintaining directional control and runway centerline with the rudder pedals
- Lower feet to the floor (toes on rudders, not brakes)
- As you start to roll, monitor your airspeed
- ICS: "Airspeed Alive"
- Keep in the right rudder and some left aileron to counteract the p-factor crosswind effect as required
- As you accelerate, the aircraft must be flown and not taxied, requiring smaller inputs
- Confirm takeoff power and proper engine and flight instrument indications before rotation
- At Vr (or as recommended for lower takeoff weight), call out, "Vr, Rotate," and increase control yoke back pressure to pitch up
- Smoothly pitch up, or the aircraft may delay a climb
- Forcing the aircraft off the ground may leave it stuck in the ground effect or stall [Figure 2]
- During gust conditions, the pilot should remain on the deck a little longer
- After lift-off, establish and maintain obstacle clearance speed until all obstacles are cleared (50' AGL) while maintaining the flight path over the runway centerline
- Trim as necessary
- Use of the rudders may be required to keep the airplane headed straight down the runway, avoiding P-factor
- The remainder of the climbing technique is the same used for normal takeoffs and climbs
- With a positive rate of climb and no available landing area remaining, depress the brake pedals, call-out, "Positive Climb"
- An increase in altitude and positive VSI demonstrates a positive rate of climb
- With no runway remaining, raise the landing gear if appropriate
- Callout: "gear up"
- If remaining in the traffic pattern, leave the landing gear down so as not to forget to lower it later
- Consider aircraft performance (decreases/increases in drag) when the gear is in motion and how that impacts desired performance
- With obstacles cleared, lower the pitch to begin accelerating to Vy (74 KIAS)
- At or above safe flying speed, retract the flaps to 0°
- Establish and maintain Vy
- Trim as necessary
- Avoid drifting off centerline or into obstructions or the path of another aircraft that may be taking off from a parallel runway
- During the climb out (no less than 200' AGL), the lower nose momentarily to ensure that the airspace ahead is clear, and then reestablish Vy while maintaining flight path over the extended runway centerline
- Trim as required
- At 500' AGL, lower the pitch to establish and maintain a cruise climb
- Maintain Vy if climb performance warrants
- Execute a departure procedure or remain in the traffic pattern as appropriate
- If remaining in the traffic pattern, leave the auxiliary fuel pump switch in the ON position
- Complete the climb flow/checklist when appropriate
- Execute a departure procedure or remain in the traffic pattern as appropriate
-
Short Field Takeoff and Climb Common Errors:
- Failure to adequately clear the area before taxiing into position on the active runway
- Insufficient back-elevator pressure during the initial takeoff roll, resulting in an inadequate angle of attack
- Failure to cross-check engine instruments for indicators of proper operation after applying power
- Poor directional control
- Climbing too steeply after lift-off
- Abrupt and/or excessive elevator control while attempting to level off and accelerate after lift-off
- Allowing the airplane to "mush" or settle, resulting in an inadvertent touchdown after lift-off
- Attempting to climb out of ground effect area before attaining sufficient climb speed
- Failure to anticipate an increase in pitch attitude as the airplane climbs out of ground effect
- Inadequate drift correction after lift-off
- Be sure your track over the ground stays aligned with the runway as part of the upwind leg
- Do not allow the aircraft to drift closer to downwind, as aircraft may be present
-
Short-Field Takeoff and Maximum Performance Climb (ASEL, AMEL):
- To determine that the applicant exhibits satisfactory knowledge, risk management, and skills associated with a short-field takeoff, maximum performance climb operations, and rejected takeoff procedures
- References: FAA-H-8083-2, FAA-H-8083-3; POH/AFM; AIM
Short-Field Takeoff and Maximum Performance Climb (ASEL, AMEL) Knowledge:
The applicant must demonstrate an understanding of:-
PA.IV.E.K1:
Effects of atmospheric conditions, including wind, on takeoff and climb performance -
PA.IV.E.K2:
Vx and Vy -
PA.IV.E.K3:
Appropriate airplane configuration
Short-Field Takeoff and Maximum Performance Climb (ASEL, AMEL) Risk Management:
The applicant demonstrates the ability to identify, assess, and mitigate risks, encompassing:PA.IV.E.R1:
Selection of runway based on pilot capability, airplane performance and limitations, available distance, and wind-
PA.IV.E.R2:
Effects of:-
PA.IV.E.R2a:
Crosswind -
PA.IV.E.R2b:
Windshear -
PA.IV.E.R2c:
Tailwind -
PA.IV.E.R2d:
Wake turbulence -
PA.IV.E.R2e:
Runway surface/condition
-
-
PA.IV.E.R3:
Abnormal operations, to include planning for:-
PA.IV.E.R3a:
Rejected takeoff -
PA.IV.E.R3b:
Engine failure in takeoff/climb phase of flight
-
-
PA.IV.E.R4:
Collision hazards, to include aircraft, terrain, obstacles, wires, vehicles, persons, and wildlife -
PA.IV.E.R5:
Low altitude maneuvering including stall, spin, or CFIT PA.IV.E.R6:
Distractions, loss of situational awareness, or improper task management
Short-Field Takeoff and Maximum Performance Climb (ASEL, AMEL) Skills:
The applicant demonstrates the ability to:-
PA.IV.E.S1:
Complete the appropriate checklist -
PA.IV.E.S2:
Make radio calls as appropriate -
PA.IV.E.S3:
Verify assigned/correct runway -
PA.IV.E.S4:
Ascertain wind direction with or without visible wind direction indicators -
PA.IV.E.S5:
Position the flight controls for the existing wind -
PA.IV.E.S6:
Clear the area, taxi into takeoff position and align the airplane on the runway centerline utilizing maximum available takeoff area PA.IV.E.S7:
Apply brakes while setting engine power to achieve maximum performancePA.IV.E.S8:
Confirm takeoff power prior to brake release and verify proper engine and flight instrument indications prior to rotationPA.IV.E.S9:
Rotate and lift off at the recommended airspeed and accelerate to the recommended obstacle clearance airspeed or Vx, +10/-5 knotsPA.IV.E.S10:
Establish a pitch attitude that will maintain the recommended obstacle clearance airspeed or VX, +10/-5 knots until clearing the obstacle or until the airplane is 50 feet above the surfacePA.IV.E.S11:
Establish a pitch attitude for Vy and accelerate to Vy, +10/-5 knots after clearing the obstacle or at 50 feet AGL if simulating an obstaclePA.IV.E.S12:
Configure the airplane in accordance with the manufacturer's guidance after a positive rate of climb has been verifiedPA.IV.E.S13:
Maintain Vy +10/-5 knots to a safe maneuvering altitudePA.IV.E.S14:
Maintain directional control and proper wind-drift correction throughout takeoff and climb-
PA.IV.E.S15:
Comply with noise abatement procedures

Confined Area Takeoff and Maximum Performance Climb:
- More austere and even urban airport environments require obstacle negotiation
-
Confined Area Takeoff and Maximum Performance Climb (ASES, AMES) Airman Certification Standards:
- To determine that the applicant exhibits satisfactory knowledge, risk management, and skills associated with a confined area takeoff and maximum performance climb operations
- References: FAA-H-8083-2, FAA-H-8083-3, FAA-H-8083-23; POH/AFM; AIM
Confined Area Takeoff and Maximum Performance Climb (ASES, AMES) Knowledge:
The applicant must demonstrate an understanding of:-
PA.IV.G.K1:
Effects of atmospheric conditions, including wind, on takeoff and climb performance -
PA.IV.G.K2:
Vx and Vy -
PA.IV.G.K3:
Appropriate airplane configuration -
PA.IV.G.K4:
Effects of water surface
Confined Area Takeoff and Maximum Performance Climb (ASES, AMES) Risk Management:
The applicant demonstrates the ability to identify, assess, and mitigate risks, encompassing:-
PA.IV.G.R1:
Selection of approach path and touchdown area based on pilot capability, airplane performance and limitations, available distance, and wind -
PA.IV.G.R2:
Effects of:-
PA.IV.G.R2a:
Crosswind -
PA.IV.G.R2b:
Windshear -
PA.IV.G.R2c:
Tailwind -
PA.IV.G.R2d:
Wake turbulence -
PA.IV.G.R2e:
Runway surface/condition
-
-
PA.IV.G.R3:
Abnormal operations, to include planning for-
PA.IV.G.R3a:
Rejected takeoff -
PA.IV.G.R3b:
Engine failure in takeoff/climb phase of flight
-
-
PA.IV.G.R4:
Collision hazards, to include aircraft, terrain, obstacles, wires, vessels, persons, and wildlife -
PA.IV.G.R5:
Low altitude maneuvering including stall, spin, or CFIT PA.IV.G.R6:
Distractions, loss of situational awareness, or improper task management
Confined Area Takeoff and Maximum Performance Climb (ASES, AMES) Skills:
The applicant demonstrates the ability to:-
PA.IV.G.S1:
Complete the appropriate checklist -
PA.IV.G.S2:
Make radio calls as appropriate -
PA.IV.G.S3:
Verify assigned/correct takeoff path -
PA.IV.G.S4:
Ascertain wind direction with or without visible wind direction indicators -
PA.IV.G.S5:
Position the flight controls for the existing wind. -
PA.IV.G.S6:
Clear the area, taxi into takeoff position utilizing maximum available takeoff area and align the airplane on the takeoff path PA.IV.G.S7:
Confirm takeoff power and proper engine and flight instrument indications prior to rotationPA.IV.G.S8:
Establish a pitch attitude that maintains the most efficient planing/liftoff attitude and correct for porpoising and skippingPA.IV.G.S9:
Avoid excessive water spray on the propeller(s)PA.IV.G.S10:
Rotate and liftoff at the recommended airspeed, and accelerate to the recommended obstacle clearance airspeed or VxPA.IV.G.S11:
Establish a pitch attitude that will maintain the recommended obstacle clearance airspeed or Vx, +10/-5 knots until the obstacle is cleared or until the airplane is 50 feet above the surfacePA.IV.G.S12:
Establish a pitch attitude for Vy and accelerate to Vy +10/-5 knots after clearing the obstacle or at 50 feet AGL if simulating an obstaclePA.IV.G.S13:
Retract flaps, if extended, after a positive rate of climb has been verified or in accordance with airplane manufacturer's guidancePA.IV.G.S14:
Maintain Vy +10/-5 knots to a safe maneuvering altitudePA.IV.G.S15:
Maintain directional control and proper wind-drift correction throughout takeoff and climb-
PA.IV.G.S16:
Comply with noise abatement procedures
Obstacles:
- When obstacle hazards are present, there are a few things to consider:
- Is it possible to take off in a different direction without meaningfully sacrificing performance?
- Is best angle required and for how long?
- Is a headwind or tailwind expected upon takeoff that will impact ground speed?
- Approaching a ridge in a headwind may result in downdrafts while approaching a ridge with a tailwind may result in updrafts
- Always approach ridges at an angle to allow for an escape plan (turn) if needed
- Note that any turn will result in a lower vertical component of lift (slower climb rate)
- If obstacles are present in areas in which a pilot operates frequently, consider dedicated mountain flying training
Rejected Takeoffs:
- Emergency or abnormal situations can occur during a takeoff that requires a pilot to reject the takeoff (RTO) while still on the runway
- Circumstances such as a malfunctioning powerplant or other emergency, inadequate acceleration, runway incursion, or air traffic conflict may be reasons for a rejected takeoff
- Before takeoff, as part of preflight planning, the pilot should identify a point along the runway at which the airplane should be airborne
- This is related to the FARs 91.103 and 91.175 requirements for knowing runway and takeoff performance data
- If that point is reached and the airplane is not airborne, immediate action should be taken to discontinue the takeoff
- Properly planned and executed, the airplane can be stopped on the remaining runway without using extraordinary measures, such as excessive braking that may result in loss of directional control, airplane damage, and/or personal injury
- In the event a takeoff is rejected, the power is reduced to idle, and maximum braking applied, while maintaining directional control
- If it is necessary to shut down the engine due to a fire, the mixture control should be brought to the idle cutoff position, and the magnetos turned off
- In all cases, the manufacturer's emergency procedure should be followed
- Urgency characterizes all power loss or engine failure occurrences after lift-off
- In most instances, the pilot has only a few seconds after an engine failure to decide what course of action to take and to execute it
- In the event of an engine failure on the initial climb-out, the pilot's first responsibility is to maintain aircraft control
- At a climb pitch attitude without power, the airplane is at or near a stalling AOA
- At the same time, the pilot may still be holding the right rudder
- The pilot must immediately lower the nose to prevent a stall while moving the rudder to ensure coordinated flight
- Attempting to turn back to the takeoff runway (often referred to as the impossible turn) should not be attempted
- The pilot should establish a controlled glide toward a plausible landing area, preferably straight ahead
- For twin-engine aircraft, if an engine fails below Vmc while the airplane is on the ground, the takeoff must be rejected
- Directional control can only be maintained by promptly closing both throttles and using rudder and brakes as required
- A takeoff can be rejected for the same reasons a takeoff in a single-engine airplane would be rejected
- Aggressive use of the rudder, nosewheel steering, and brakes may be required to keep the airplane on the runway
- Particularly, if an engine failure is not immediately recognized and accompanied by prompt closure of both throttles
- However, the primary objective is not necessarily to stop the airplane in the shortest distance but to maintain control of the airplane as it decelerates
- In some situations, it may be preferable to continue into the overrun area under control rather than risk directional control loss, landing gear collapse, or tire/brake failure in an attempt to stop the airplane in the shortest possible distance
- Aggressive use of the rudder, nosewheel steering, and brakes may be required to keep the airplane on the runway
-
Stopping Distance Performance:
- The kinetic energy of any aircraft (and thus the deceleration power required to stop it) increases with aircraft weight and the square of the aircraft speed
- Therefore, an increase in weight has a lesser impact on kinetic energy than a proportional increase in groundspeed
- A 10 percent increase in takeoff weight produces roughly a 10 percent increase in kinetic energy, while a 10 percent increase in speed results in a 21 percent increase in kinetic energy
- Hence, it should be stressed during pilot training that time (delayed decision or reaction) equals higher speed (to the tune of at least 4 knots per second for most), and higher speed equals longer stopping distance
- A couple of seconds can be the difference between running out of runway and coming to a safe halt
- Because weight ceases to be a variable once the doors are closed, the throttles are pushed forward, and the airplane is launching down the runway, all focus should be on timely recognition and speed control
- The decision to abort takeoff should not be attempted beyond the calculated decision point unless there is reason to suspect that the airplane's ability to fly has been impaired or is threatened to cease shortly after takeoff
- It is paramount to remember that FAA-approved takeoff data for any aircraft is based on aircraft performance demonstrated in ideal conditions, using a clean, dry runway, and maximum braking (reverse thrust is not used to compute stopping distance)
- In reality, stopping performance can be further degraded by an array of factors as diversified as:
- Runway friction (grooved/non-grooved)
- Mechanical runway contaminants (rubber, oily residue, debris)
- Natural contaminants (standing water, snow, slush, ice, dust)
- Wind direction and velocity
- Air density
- Flaps configuration
- Bleed air configuration
- Underinflated or failing tires
- Penalizing MEL or CDL items
- Deficient wheel brakes or RTO auto-brakes
- Inoperative anti-skid
- Pilot technique and individual proficiency
- Time required to identify the need to abort
- The kinetic energy of any aircraft (and thus the deceleration power required to stop it) increases with aircraft weight and the square of the aircraft speed
- Proper use of brakes should be emphasized in training, as they have the most stopping power during a rejected takeoff
- However, experience has shown that the initial tendency of a flight crew is to use normal after-landing braking during a rejected takeoff
- Delaying the intervention of the primary deceleration force during an RTO maneuver, when every second counts, could be costly in terms of the required stopping distance
- Instead of braking after the throttles are retarded and the spoilers are deployed (normal landing), pilots must apply maximum braking immediately while simultaneously retarding the throttles, with spoilers extension and thrust reversers deployment following in a short sequence
- Differential braking applied to maintain directional control also diminishes the effectiveness of the brakes
- Finally, not only does a blown tire eliminate any kind of braking action on that particular tire, but it could also lead to the failure of adjacent tires, thus further impairing the airplane's ability to stop
Noise Abatement:
- Aircraft noise problems are a significant concern at many airports throughout the country. Many local communities have pressured airports into developing specific operational procedures that help limit aircraft noise while operating over nearby areas. As a result, noise abatement procedures for several airports have been developed and include standardized profiles and procedures to achieve these lower noise goals
- Airports with noise abatement procedures inform pilots, operators, air carriers, air traffic facilities, and other special groups that apply to their airports. These procedures are available to the aviation community by various means. Most of this information comes from Chart Supplements, local and regional publications, printed handouts, operator bulletin boards, safety briefings, and local air traffic facilities
- Reminder signs may be installed at the taxiway hold positions for applicable runways to remind pilots to use and comply with noise abatement procedures on departure. Pilots unfamiliar with these procedures should ask the tower or air traffic facility for the recommended procedures. Pilots should be considerate of the surrounding community while operating their airplanes to and from such an airport, including operating as quietly and safely as possible
- Noise abatement rules are the domain of the FAA; however, that will not always stop municipalities from creating their restrictions, such as Scottsdale, AZ
- When flying to new airports, consider researching local rules
- If you hear phrases from ATC such as "noise abatement procedures are in effect," then this can be a huge clue
- While the FAA rules should overrule municipalities, it is always a good idea to be a good neighbor
- Always consult the aircraft's Pilot Operating Handbook for amplifying information regarding noise abatement
- Noise abatement notices can be found in the chart supplement, U.S.
Intersection Takeoffs:
- To enhance airport capacities, reduce taxiing distances, minimize departure delays, and provide for more efficient movement of air traffic, controllers may initiate intersection takeoffs as well as approve them when the pilot requests
- Pilots must assess the suitability of an intersection for use at takeoff during their preflight planning
- They must consider the resultant length reduction to the published runway length and the published declared distances from the intersection intended for takeoff
- The minimum runway required for takeoff must fall within the reduced runway length and the reduced declared distances
- Controllers will issue the measured distance from the intersection to the runway end-rounded "down" to the nearest 50 feet to any pilot who requests and to all military aircraft unless appropriate directives cover the use of the intersection
- Controllers, however, will not be able to inform pilots of the distance from the intersection to the end of any of the published declared distances
- If, for ANY reason, a pilot prefers to use a different intersection or the full length of the runway or desires to obtain the distance between the intersection and the runway end, THE PILOT IS EXPECTED TO INFORM ATC ACCORDINGLY
- An aircraft may taxi to (but not onto) the end of the assigned runway unless receiving prior approval for an intersection departure from ground control
- Pilots should state their position when calling the tower for takeoff
- Pilot: "[Location] Tower, [Callsign], at alpha 2, ready for departure [Runway]"
- Example: "Cleveland Tower, Apache Three Seven Two Two Papa, at alpha 2, ready for departure runway two-four"
- Pilot: "[Location] Tower, [Callsign], at alpha 2, ready for departure [Runway]"
- Controllers are required to separate small aircraft that are departing from an intersection on the same runway (same or opposite direction) behind large nonheavy aircraft (except B757) by ensuring that at least a 3-minute interval exists between the time the preceding large aircraft has taken off and the succeeding small aircraft begins takeoff roll
- Small aircraft receive a 3-minute separation with a maximum certificated takeoff weight of 12,500 pounds or less departing behind a small aircraft with a maximum certificated takeoff weight of more than 12,500 pounds
- To inform the pilot of the required 3-minute hold, the controller will state, "Hold for wake turbulence"
- If, after considering wake turbulence hazards, the pilot feels that a lesser time interval is appropriate, the pilot may request a waiver to the 3-minute interval
- PILOT: "Request waiver to 3-minute interval"
- Controllers may then issue a takeoff clearance if other traffic permits since the pilot has accepted the responsibility for wake turbulence separation
- The 3-minute interval is not required when the intersection is 500 feet or less from the departure point of the preceding aircraft and both aircraft are taking off in the same direction
- Controllers may permit the small aircraft to alter course after takeoff to avoid the flight path of the preceding departure
- A 4-minute interval is mandatory for small, large, and heavy aircraft behind a super aircraft
- The 3-minute interval is mandatory behind a heavy aircraft in all cases and for small aircraft behind a B757
Avionics and Electronic FLight Bag Tools:
- Set avionics to display terrain when climbing, especially in unfamiliar locations, and especially when weather is poor
Abnormal Takeoff and Climb Procedures:
- Whenever something abnormal occurs after the takeoff, consider turning back and resetting
- Conditions can worsen away from the airport, and abnormal is just that - not normal
Rejected Takeoffs
- Engine Failure After Takeoff
Takeoff and Climb Case Studies:
- NTSB Identification: WPR14CA009:
- The NTSB determines the probable cause(s) of this accident to be: The pilot's decision to continue the takeoff from a wet and soft airstrip, which resulted in his failure to maintain adequate airspeed and aircraft control during the initial takeoff climb
- National Transportation Safety Board Identification: CHI00LA013:
- The NTSB determines the probable cause(s) of this accident to be: The pilot's inadequate preflight planning and decision to perform an intersection takeoff and the improper short field, rolling, intersection takeoff. A factor relating to this accident was the trees
- National Transportation Safety Board Identification: CEN15FA249:
- The NTSB determines the probable cause(s) of this accident to be: The pilot's failure to maintain sufficient airspeed following a loss of engine power during the initial takeoff climb, resulting in the airplane's wing exceeding its critical angle-of-attack and a subsequent aerodynamic stall. The reason for the loss of engine power could not be determined because the examination of the wreckage revealed no mechanical deficiencies. Contributing to the accident was the pilot's decision to conduct an intersection takeoff
- National Transportation Safety Board Identification: DCA06MA064:
- The NTSB determines the probable cause(s) of this accident to be: The flight crewmembers's failure to use available cues and aids to identify the airplane's location on the airport surface during taxi and their failure to cross-check and verify that the airplane was on the correct runway before takeoff. Contributing to the accident was the flight crew's nonpertinent conversation during taxi, which resulted in a loss of positional awareness, and the Federal Aviation Administration's failure to require that all runway crossings be authorized only by specific air traffic control clearances
Conclusion:
- Takeoffs and climbs begin with a solid pre-takeoff briefing
- When briefing, contingencies are less about recycling words from previous briefings but about having decision points that, when not met, trigger an action
- Without these decision points, it may be tempting to think too far ahead of the aircraft and not recognize an emergent danger
- With takeoff performance calculated, consider applying the 70/50 rule for abort criteria, whereby if you haven't achieved 70% of your calculated rotation speed by 50% of the runway, you should abort
- Note that when clearing the runway for traffic, terrain may mask the opposite side of the airfield, an especially important note at uncontrolled airfields
- When winds are calm, and if the layout permits, consider taking off in an area that permits you to observe surface operations best vs. what positions your flight path most advantageously for your departure
- When requesting takeoff, be prepared to copy/readback any heading or altitude assignments
- Takeoff performance is dependent on a number of factors
- Consider different techniques when departing from shorter airfields, when obstacles are present, when crosswinds are present, or when operating out of a soft (grass/dirt) airfield
- Understanding the basics and executing normal takeoffs will set you up for success when performing short, soft, or crosswind takeoffs
- Note that when an instructor/passenger is not in the plane, the weight will be less, and therefore the pitch attitude may differ: airborne sooner, climb more rapidly, higher performance
- After reaching the hold short and completing all checklists, you are ready to call for takeoff clearance
- You may receive an immediate takeoff clearance and don't want to get behind the aircraft at this point
- If ever told to taxi off the active and you receive a subsequent clearance, perform all takeoff checklists AGAIN
- Actively listen to the takeoff clearance
- You may receive a direction to turn after departure, but don't confuse that for the direction to turn onto the runway, as you may face the wrong direction
- The best rate and angle of climb are applicable to the situation, rather than the type of takeoff, requiring evaluation to which is best during preflight planning
- Consider filling out a crosswind sheet with the limits of your aircraft to be able to quickly determine if a wind component is within your aircraft's limitations [Figure 4]
- Be sure to calculate your takeoff and climb performance before each flight, as per flight planning requirements
- Takeoff (and landing) factors are dependent on: thrust, weight, lift, drag, and friction (runway surfaces)
- Have trouble in the flare? Consider the highway picture
- Remember the lessons learned while performing power-on stalls, which simulate the conditions and demanded a response of a stall experienced while on departure
- If offered intersection takeoffs, take the time to apply aeronautical decision-making; don't rush!
- Risks include: reducing runway available (due now to runway behind you), wrong direction departures (due to lack of runway markings during line up)
- Intersection takeoffs make a great case in point for the requirement to calculate takeoff performance as a part 91.103 preflight actions accurately and to verify the heading direction with the heading indicator (use the bug/course indicator) or magnetic compass
- Put another way, when air traffic provides the runway available from the intersection, you need an accurate performance number to cross-check against, but even that may be invalid if you take off in the wrong direction
- Ill-advised rejected takeoff decisions by flight crews and improper pilot technique during the execution of a rejected takeoff contribute to a majority of takeoff-related commercial aviation accidents worldwide
- Statistically, although only 2 percent of rejected takeoffs are in this category, high-speed aborts above 120 knots account for the vast majority of RTO overrun accidents
- Four out of five rejected takeoffs occur at speeds below 80 knots and generally come to a safe and successful conclusion
- To watch a case study of a pilot who accepted a takeoff clearance when seemingly rushed, see the runway safety simulator - unable video
- Consider practicing maneuvers on a flight simulator to introduce yourself to maneuvers or knock off the rust
- Review safety considerations through AOPA's takeoffs and landings safety center
- Review all aspects of an air traffic control clearance
- Check out the AOPA's density altitude quiz
- The AOPA also offers a runway safety course
- Still looking for something? Continue searching:
References:
- Federal Aviation Administration - Pilot/Controller Glossary
- Airplane Flying Handbook (Chapter 5) Normal Takeoff and Maximum Performance Climb
- Christine's Flying blog - Calculating the Crosswind components
- NTSB (SA-071) Do Your Takeoff Homework; Runway Length Matters
- Reddit - Crosswind component calculation
- Pilot Workshops - Intersection Takeoffs
- FAA - Airman Certification Standards
- Flying Magazine - Lights, Camera, Action!
- Aeronautical Information Manual (4-3-6) Use of Runways/Declared Distances
- Aeronautical Information Manual (4-3-10) Intersection Takeoffs
- Pilot Workshop - Slushy Departures
- Pilot Workshop - Takeoff Performance Skepticism
- FAAO JO 7110.65 (3-7-1) Ground Traffic Movement
- AOPA - It's All Noise